PXE from an nspawn container


This post will cover the provisioning of a nspawn container and the installation of a tftp-hpa serving pxelinux.0. While this sounds simple enough, and there are millions of other posts just like this one, I will be covering how I set everything up in nspawn using my Edge Router Lite (ERL3) for DHCP.
Provisioning the container
-
Create a rootfs for the container.
machinectl clone xenial-base pxe-server -
Generate a unit file for the new container config.
cat > /etc/systemd/nspawn/pxe-server.nspawn <<EOF
[Exec]
Boot=on

[Network]
VirtualEthernet=yes
Bridge=br0
EOF
-
Reload the systemd daemon.
systemctl daemon-reload -
Ensure the container is started at system boot (optional)
systemctl enable systemd-nspawn@pxe-server -
Start the new container.
machinectl start pxe-server
Installing the needed software
The first thing to do is access the container.
machinectl shell root@pxe-server -- /bin/bash
Before getting started export a couple of environment variables into the working shell. This is done to simplify commands and future references to variables set in configuration files.
export tftpboot_dir="/var/lib/tftpboot"
export tftp_server="172.16.24.90"
export tftp_ssh_key="XXX"
export image_url="http://releases.ubuntu.com/16.04.2/ubuntu-16.04.2-server-amd64.iso"
export image_name="$(basename ${image_url})"
export image_short_name="$(basename -s .iso ${image_name})"
NOTE: These variables are used in different places as simple references throughout this post. Be mindful of these options and make the needed changes to the configuration files as needed.
Package installation
The first thing to do is install the set of packages we need, then we'll configure it all.
apt install -y tftpd-hpa inetutils-inetd nginx p7zip-full p7zip-rar
Web Server setup
Create an NGINX config for the PXE files being served over the network. The default sites-enabled file, at /etc/nginx/sites-enabled/default.
server {
  listen 80 default_server;
  listen [::]:80 default_server;
  root /var/www/pxe;
  location / {
    autoindex on;
  }
}
After the configuration file is in place, restart NGINX to ensure it takes effect.
systemctl restart nginx
TFTP-HPA setup
Before we're able to meaningfully use TFTP we'll need to create the defaults file for the service and then we'll need to setup inetd.
These are the default options I use which are contained within the /etc/default/tftpd-hpa file.
TFTP_USERNAME="tftp"
TFTP_DIRECTORY="/var/lib/tftpboot"
TFTP_ADDRESS=":69"
TFTP_OPTIONS="--secure"
RUN_DAEMON="yes"
OPTIONS="-l -s /var/lib/tftpboot"
And here is my inetd configuration file located at /etc/inetd.conf.
tftp dgram udp wait root /usr/sbin/in.tftpd /usr/sbin/in.tftpd -s /var/lib/tftpboot
With those changes taken care of, restart the services to ensure they've gone into effect:
systemctl restart tftpd-hpa
systemctl restart inetutils-inetd
PXE server setup
To get our web server serving the correct files used to PXE boot our hosts we're going to need to create a couple directories.
mkdir -p /var/www/pxe
mkdir -p /var/www/pxe/scripts
mkdir -p /var/www/pxe/networking
mkdir -p /var/www/pxe/iso
mkdir -p /var/www/pxe/images

mkdir -p "${tftpboot_dir}"
mkdir -p "${tftpboot_dir}/boot-screens"
mkdir -p "${tftpboot_dir}/preseed"
mkdir -p "${tftpboot_dir}/pxelinux.cfg"
Change directories to the /var/www/pxe and download the latest stable pxelinux release. At the time of this writing 6.03 was the latest stable tarball. Once you've downloaded the file and extract the contents in place.
wget https://www.kernel.org/pub/linux/utils/boot/syslinux/syslinux-6.03.tar.gz
tar xf syslinux-6.03.tar.gz
Change directories into the newly created syslinux-6.03 directory so that we can begin hard linking files from this download into the appropriate locations.
ln -f /var/www/pxe/syslinux-6.03/bios/com32/elflink/ldlinux/ldlinux.c32 "${tftpboot_dir}/ldlinux.c32"
ln -f /var/www/pxe/syslinux-6.03/bios/core/pxelinux.0 "${tftpboot_dir}/pxelinux.0"
ln -f /var/www/pxe/syslinux-6.03/bios/com32/lib/libcom32.c32 "${tftpboot_dir}/boot-screens/libcom32.c32"
ln -f /var/www/pxe/syslinux-6.03/bios/com32/libutil/libutil.c32 "${tftpboot_dir}/boot-screens/libutil.c32"
ln -f /var/www/pxe/syslinux-6.03/bios/com32/menu/vesamenu.c32 "${tftpboot_dir}/boot-screens/vesamenu.c32"
Change directories into ${tftpboot_dir} and create a couple files used to instruct our PXE server how to handle the normal boot process.
The first file we need is a default config which will load our normal menu. Create the file ${tftpboot_dir}/pxelinux.cfg/default with the following contents:
path boot-screens
include boot-screens/menu.cfg
default boot-screens/vesamenu.c32
prompt 0
timeout 100
NOTE: In the
${tftpboot_dir}/pxelinux.cfg/defaultfile be mindful or trailing white space as it will break in unexpected ways if you have any.
Change directories to the ${tftpboot_dir}/boot-screens and hard Link the default file to the syslinux.cfg file found in the boot-screens directory.
ln -f ../pxelinux.cfg/default syslinux.cfg
Image setup
Change your working directory to /var/www/pxe/iso and download the image.
wget "${image_url}" -O "${image_name}"
Change directories to /var/www/pxe/images, create the image directory, and extract the contents of the ISO in place.
mkdir "${image_short_name}"
pushd "${image_short_name}"
  7z x "/var/www/pxe/iso/${image_name}"
popd
Bind mount the netboot-installer directory into our tftpboot directory. We're using a bind mount here because a symbolic link won't work and I don't want to copy the files creating duplicates of things I already have.
mount -o bind "/var/www/pxe/images/${image_short_name}/install/netboot/ubuntu-installer" "${tftpboot_dir}/${image_short_name}"
To make the bind mount persistent you have two options:
- Save a line in the
/etc/fstabfile.
echo "/var/www/pxe/images/${image_short_name}/install/netboot/ubuntu-installer ${tftpboot_dir}/${image_short_name} none defaults,bind 0 0" | tee -a /etc/fstab
- Create a systemd unit file for the mount at
/etc/systemd/system/$(systemd-escape -p --suffix=mount "${tftpboot_dir}/${image_short_name}")
NOTE: the
systemd-escapecommand is required when creating systemd "mount" unit files.
[Mount]
What=/var/www/pxe/images/${image_short_name}/install/netboot/ubuntu-installer
Where=${tftpboot_dir}/${image_short_name}
Type=bind
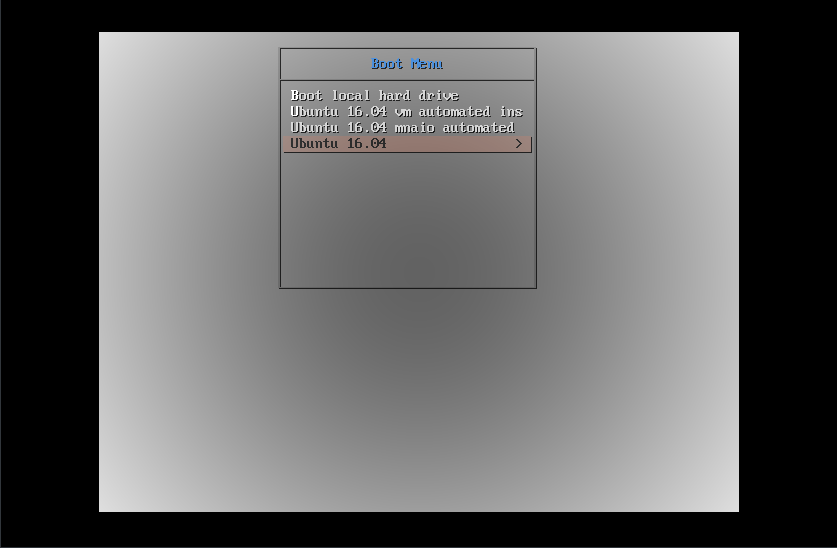
Basic boot menu
Create the menu configuration we'll use to local boot by default and provide provisioning options when a server is powered on. Within the same ${tftpboot_dir}/boot-screens directory create the menu.cfg file.
menu hshift 13
menu width 49
menu margin 8
menu tabmsg

menu title Boot Menu
label local
        menu label ^Boot local hard drive
        LOCALBOOT 0

label auto-ubuntu-16.04
        menu label ^Ubuntu 16.04
        kernel ${image_short_name}/amd64/linux
        append biosdevname=0 net.ifnames=0 auto=true priority=critical vga=789 initrd=${image_short_name}/amd64/initrd.gz preseed/url=http://${tftp_server}/images/ubuntu-16.04.2-server-amd64/preseed/ubuntu-server.seed netcfg/choose_interface=eth0

menu end
NOTE: In the
${tftpboot_dir}/boot-screens/menu.cfgfile be mindful or trailing white space as it will break in unexpected ways if you have any.
Finally set the ownership of our directories.
find /var/www/pxe -type d -exec chmod -R 0755 {} \;
chown -R root:root "${tftpboot_dir}"
chown -R www-data:www-data /var/www
Setting up the ERL3
The ERL3, is the edge device responsible for all DHCP, DNS, and a few other services within my network. So to get PXE going within my home I'm going to configure the DHCP server to provide the boot file and then target the tftp server which is now running within our nspawn container.
First SSH to the ELR3 then edit the configuration
configure # drops you into the configuration terminal
Set the boot file.
set service dhcp-server shared-network-name LAN1 subnet ${ADDRESS_CIDR} bootfile-name pxelinux.0
Set the boot server.
set service dhcp-server shared-network-name LAN1 subnet ${ADDRESS_CIDR} bootfile-server ${ADDRESS_OF_TFTP_SERVER}
Set the TFTP server to the same as the bootfile-server (assuming they're the same in your case)
set service dhcp-server shared-network-name LAN1 subnet ${ADDRESS_CIDR} tftp-server-name ${ADDRESS_OF_TFTP_SERVER}
Now commit the changes and save
commit
save
exit
Once you've exited the configuration terminal, Log out of the ERL3.
exit
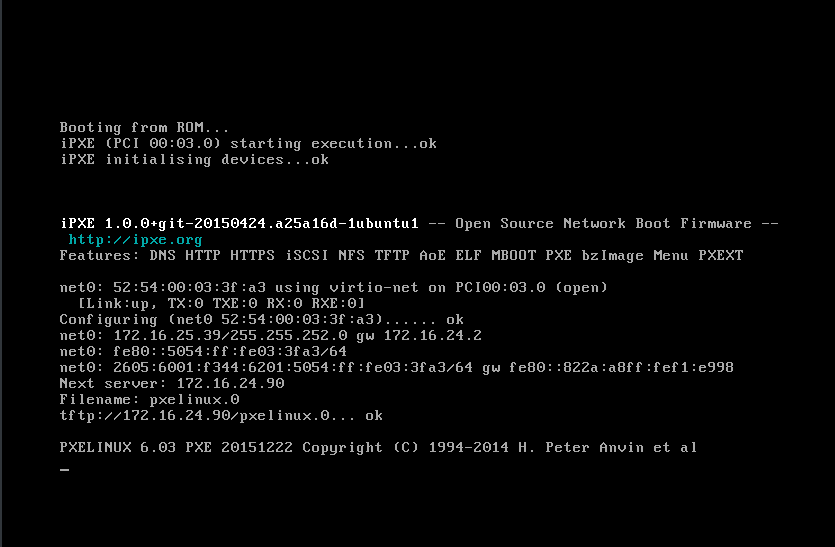
Testing it all out
Now that we've got our PXE server all setup and our DHCP server running let's fire up a machine on the same network and make sure it's all working.
Wrap-up
In this post, we spawned a container, created our tftp boot server serving pxelinux, set everything up for local boot by default with the option to install a base server OS, & configured a Ubiquity Edge Router to forward boot instructions to clients. In my next post, I'll cover an automated installation of Ubuntu which I use for both Host and VM provisioning. Stay tuned as I dive deeper into preseeds using Software RAID, setting up boot repositories, creating networks, and more.